

SQL Create Table & Insert Into
3 Easy Ways to Insert Data into a Database Table
There are several ways to add data to a database table. One of the most common methods is using SQL statements: CREATE TABLE and INSERT INTO. If your data is in an Excel or CSV file with many rows and columns, you can insert data more quickly using Coginiti Data Insert. This function allows you to upload Excel or CSV files to a supported database platform. We recommend you use it for 100k rows max, as the processing time depends on the platform’s performance.
Table of contents:
- Using SQL to create a table and insert data
- Using script functions to insert data in Coginiti
- Upload a File with Coginiti Data Insert
Using SQL to create a table and insert data
Create a table
A table is a set of rows and columns to keep structured data. The first step of creating a table is to run a simple SQL statement. The following statement names and defines its columns and each column’s data type:
CREATE TABLE table_name(
column1 datatype,
column2 datatype,
column3 datatype,
...
);
Insert data
The SQL INSERT INTO statement adds new data rows to a database table. You must set the table, all columns and values to insert data.
INSERT INTO table_name (column_1,column_2,..)
VALUES (value_1,value_2,..);
Using script functions to insert data in Coginiti
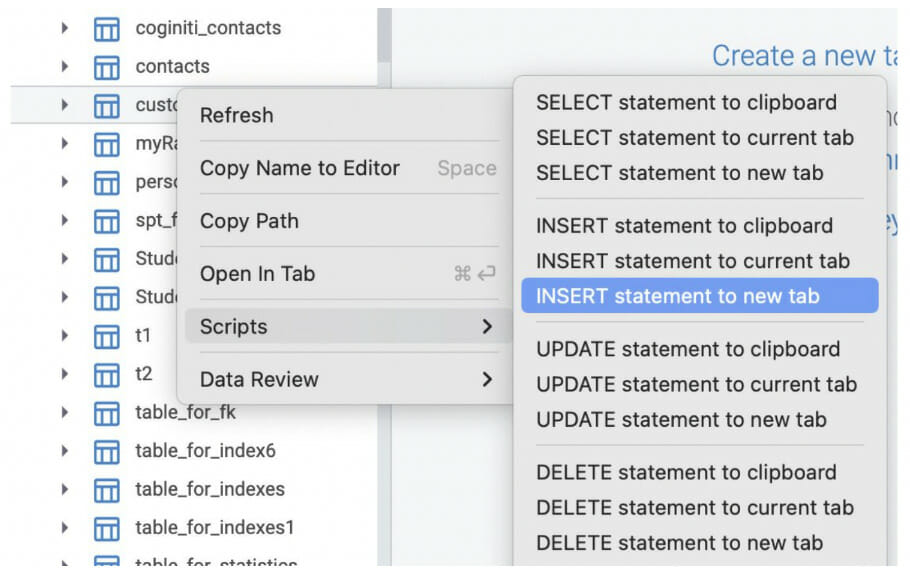
- Go to the Database Explorer and select your database
- Find the table you want to insert data
- Right-click on that table
- Select Scripts > INSERT statement to a current tab.
We will generate the SQL statement automatically for you in the current tab, or you can select “INSERT statement to the new tab” to work in a separate tab.
Upload a File with Coginiti Data Insert
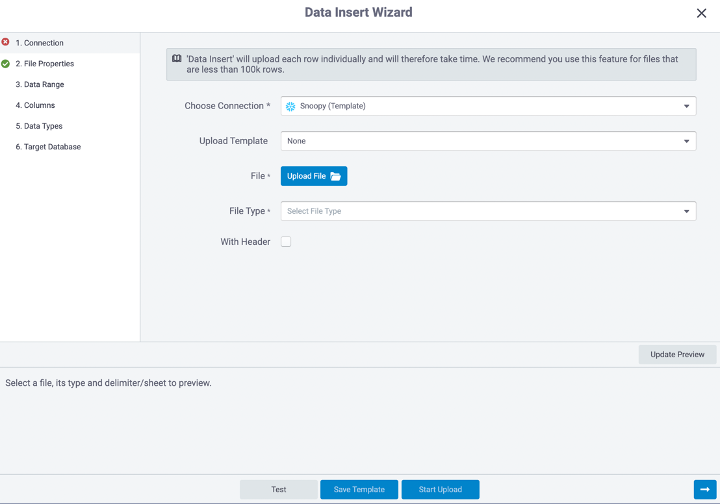
In case you need to work on an Excel or CSV file that has popped up on your desk, you can insert it into your database automatically (without coding) using Coginiti Data Insert.
- Go to Data Upload
- Import your Excel or CSV. file
- Set your file details
- Run a preview
- Upload it
Note ?
- You need to ensure that your file doesn’t contain more than 100K rows.
- You must set all the details in our Data Insert Wizard.
- Check if your file has any funky symbols. If so, make the encoding accordingly.
- You can check if there are any slipped rows.
Templates
If you need to repeat that job, you can create a template, so you don’t need to repeat all the settings every time you insert an identical file. In addition, you can update and share it with teammates that need to do the same work.

Pro tips
- Data need to be very consistent. For example, if you set a column to INTEGER, all values in the column need to be INTEGERS. Database platforms won’t let you upload if it finds a lone STRING cell.
- Date and time columns need to be in a supported format that your database accepts (you’ll find these settings on the Step 2 screen).
Some special characters are not allowed in the names of columns or tables in databases, so make sure you don’t have them.
Data platforms
Currently, Data Insert supports BigQuery, Db2, Hive, Netezza, Postgres, Redshift, Snowflake, and Greenplum.

